Using screen printing for custom T-shirts is a popular choice for many organizations, but do you know how the process works? Understanding the intricacies of screen printing can help you make informed decisions for your team’s apparel needs.
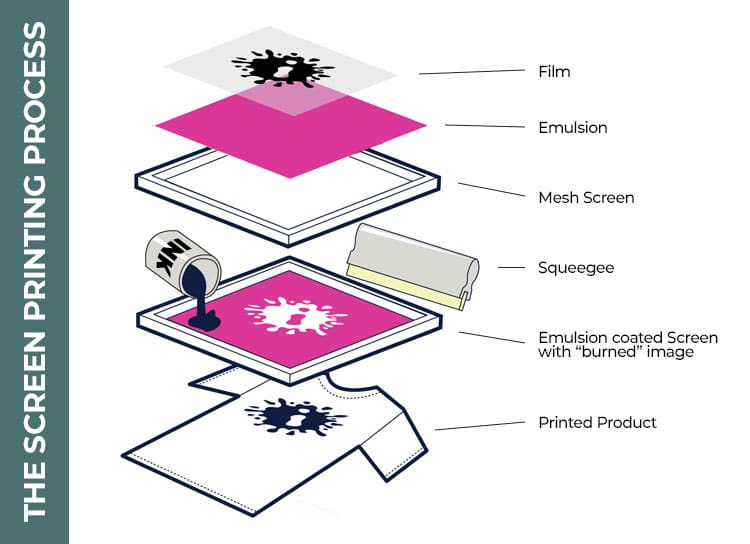
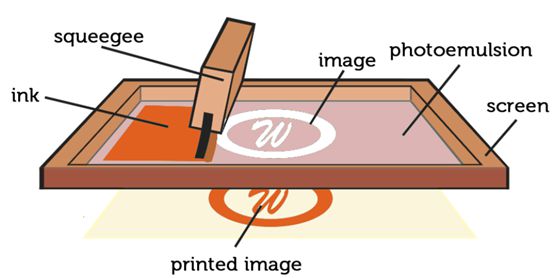
Screen printing involves transferring ink onto fabric through a mesh screen. The process begins with creating a stencil (or screen) for each color in the design. Once the screens are prepared, ink is pushed through the mesh onto the T-shirt, layer by layer. This method ensures vibrant colors and durability, making it ideal for bulk orders of custom T-shirts.
Now that we’ve covered the basics, let’s dive deeper into each step of the screen printing process.
What Materials Are Needed for Screen Printing Custom T-Shirts?
To get started with screen printing, you’ll need several materials, including:
- Inks: Choose high-quality inks suitable for fabric to ensure vibrant colors and durability. Water-based inks are popular for their soft finish, while plastisol inks provide rich color and opacity.
- Screens: A mesh screen that allows ink to pass through, usually made from polyester. The mesh count can vary, affecting the detail of the print.
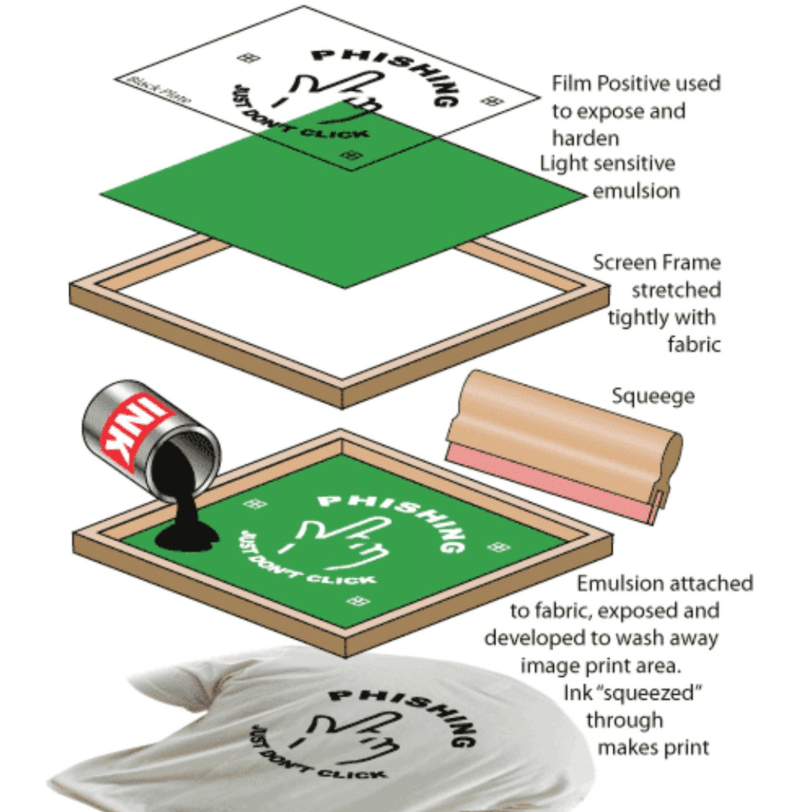
- Emulsion: A light-sensitive liquid used to create a stencil on the screen. It’s essential for defining the areas where ink will not pass through.
- Squeegee: A tool used to spread the ink across the screen. The durometer (hardness) of the squeegee will influence the thickness of the ink application.
- T-Shirts: The fabric you’ll be printing on, with options ranging from cotton to blends. Fabric choice can impact ink adhesion and the overall feel of the final product.

What Are the Key Steps in the Screen Printing Process?
- Design Creation: Start by designing your artwork using graphic design software. The design should be in layers to facilitate color separation.
- Preparing the Screen: Apply emulsion to the screen evenly and let it dry in a dark room to prevent premature exposure.
- Exposing the Emulsion: Place the design on top of the screen and expose it to light. The light hardens the emulsion, creating your stencil, while the unexposed areas remain soft and can be washed out.
- Applying the Ink: Position the screen on the T-shirt and use the squeegee to push ink through the stencil onto the fabric. Multiple passes may be needed for vibrant colors.
- Curing the Ink: After printing, cure the ink using heat (usually around 320°F) to set it properly, ensuring durability and washability.

What Are the Advantages of Screen Printing Over Other Methods?
Screen printing offers several benefits:
- Durability: Prints made with screen printing last longer, even after multiple washes, making it ideal for uniforms and promotional wear.
- Color Vibrancy: It produces bright, opaque colors, especially on dark fabrics, providing excellent coverage and impact.
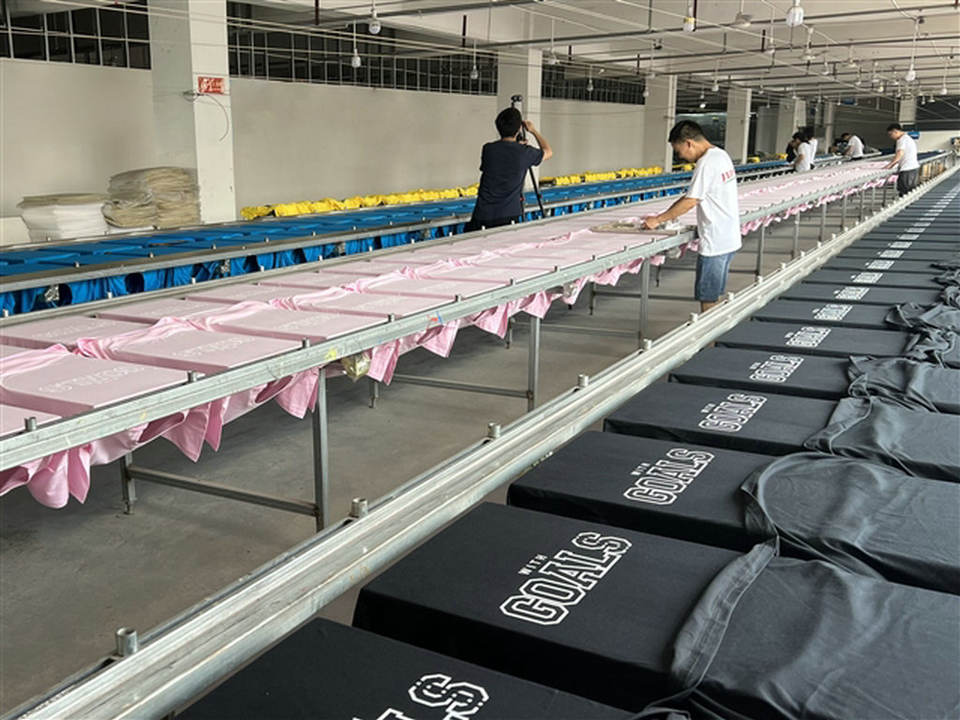
- Cost-Effectiveness for Bulk Orders: The more you print, the lower the cost per shirt becomes, making it a budget-friendly option for larger orders.
- Versatility: Screen printing can be applied to various materials beyond cotton, including polyester and blends, expanding your apparel options.

What Are the Limitations of Screen Printing?
While effective, screen printing has its drawbacks:
- Setup Costs: Initial costs can be high due to screen preparation and setup, making small orders less cost-effective.
- Limited Color Ranges: Each color requires a separate screen, making complex designs more expensive and time-consuming.
- Time-Consuming: The setup and curing process can take longer than other methods, such as digital printing, which may impact tight deadlines.

How Do You Prepare a Design for Screen Printing?
To prepare your design:
- Use high-resolution images to ensure clarity and detail.
- Simplify complex designs into solid colors to make them more suitable for screen printing.
- Ensure the design fits within the size of the screen and allows for appropriate margins.[2]

What Is the Typical Turnaround Time for Screen Printed T-Shirts?
Turnaround times can vary based on the complexity of the order and the printer’s capacity, but generally, you can expect:
- Design Creation: 3-7 days he process begins with creating the desired design, which is printed onto a transparent acetate film. This film will serve as the stencil for the screen printing process.[1][2]
- Setup Time: 1-3 days for initial preparations, including screen creation.
- Printing Time: 3-5 days for bulk orders, depending on the number of colors and shirts.
- Curing and Shipping: An additional 1-3 days for curing and delivery, so plan accordingly for larger events.[2]
In conclusion, understanding the screen printing process not only helps in selecting the right method for your custom T-shirts but also ensures that you achieve the desired quality for your events.
Engaging with a reliable supplier can streamline this process and lead to successful outcomes for your team’s apparel needs.

